Wednesday, June 17, 2009
Resubmit and Semester 2
Semester 2: Monday 20 July 5.00pm Room L112 - we will enrol you then
Saturday, June 13, 2009
Assessment this Wednesday 17 June
Hi all
This Wednesday night 17 June is your assessment for Sculpture and Photoshop.
You will need to bring all your work in to the computer lab to be ticked off and prepare a 5 minute presentation about one of your sculpture works and one of your Photoshop works.
Remember to talk about them in relation to the brief, analyze them in terms of the elements and principles of design and talk about why you choose the imagery for your self portrait - what does it say about you?
Sculpture
· Cardboard chair brief
· Wearable art brief
· Packaging brief
Photoshop
Show JPEGS of:
· Filter &/or Texture exercise
· Strange Self Portrait Brief and/or
· Postcard Brief
· N.B. If you only have one of the briefs completed you must demonstrate use of the tools outlined in both briefs in the final work you present.
· Your images can also be shown from your BLOG if you have created one (make sure you have a backup though in case the internet is down)
Let me know on Monday if you have any questions or concerns.
Jodie
Wednesday, June 10, 2009
Tonights class
- Do a Revision quiz
- Have a class discussion about each of our Strange Self Portraits
- Discuss posting your work on your own BLOG (Click HERE to go to how to set up your own blog)
- Complete the Strange Self Portraits (don't forget to include a texture from our food drawings and make yourself strange by using the techniques outline on the brief.)
- Discuss the final Design brief - The Postcard Brief
- Look at the painting tools in Photoshop
Wednesday, June 3, 2009
Celebrity drop in excercise
| Exercise 4. Celebrity drop in exercise | Lasso tools, Image adjustment, Image transformation & Retouching tools |
| · Find a high resolution image of a celebrity on the internet or use a magazine and scan image | Lasso -polygonal, magnetic Edit >transform- Scale, rotate, skew, distort, perspective, warp Clone stamp, Burning and Dodging tools Colour - hue/saturation, brightness/contrast, replace colour, colour balance, curves |
| · Cut and paste your face into the document. You may need to resize your face to fit –(set up workspace so you have a window on either side. Look at relative sizes in status bar and ensure they are the same then resize documents to match approximately. | |
| · Use LASSO tool to select your face approximately paste onto celebrity face | |
| · move into position (you may want to reduce its opacity to line it up) | |
| · Select layer with your face and free transform to be the closest match in size | |
| · Use ERASOR Tool (soft feathered edge) to blend face in | |
| · Use image adjustment tools to adjust color (color balance, brightness and contrast, Hue and Saturation) texture (filter - grain) | |
| · If necessary create shadows using BURN tool and highlights using DODGE tool | |
| · Flatten image and save as JPEG | |
| · Find a high resolution image of a celebrity on the internet or use a magazine and scan image | |
| · Cut and paste your face into the document. You may need to resize your face to fit –(set up workspace so you have a window on either side. Look at relative sizes in status bar and ensure they are the same then resize documents to match approximately. | |
| · Use LASSO tool to select your face approximately paste onto celebrity face. | |
| · move into position (you may want to reduce its opacity to line it up) | |
| · ‘Save a copy’ of image | |
| · Flatten original image Save as JPEG in your Finished Work folder |
Postcard brief
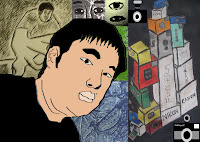
Piyabut Chairatna
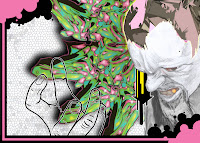
Nicholas Leineman
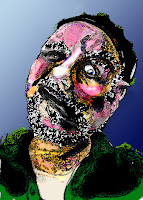
Paul Murray
Adobe Photoshop has many tools to manipulate pre-existing photographs or 2D artworks but it also has the digital equivalents of the more traditional tools like pencils, pens, brushes, sponges, erasers, etc. You can render and change by using a range of artistic filters that simulate the effect of different media.
For this brief you will create postcards that explores Adobe Photoshop’s ability to simulate traditional painting and drawing techniques as well as the digital manipulation explored in the ‘Strange Self Portrait” brief.
Theme - Self portraiture
Image size
2 documents – 1 for Postcard Front and 1 for Postcard Back
150mm x 107mm, 300dpi (includes allowance for 2mm bleed -that’s 1mm extra all around the card) This allows for a bit of the image to be cut off during the printing and cutting process.
Source images – all high resolution
· Photos or scans of the self portrait and other colour works you have been creating in ‘Drawing and Design Principles’ including food drawing images.
· Images of yourself - face and body
· Images of things or places that are ‘symbolic’ of you
Postcard back
Organise the space to include details about the artwork and artists; a space for writing; and an area to include an address and stamp, appropriate for postage with Australia Post. You may want to include an image with reduced opacity(watermark) or logo
Postcard 1
Postcard Front
Collage of original work with overdrawing
Digitally collage images of artworks, objects and places , together using copy and paste.
Import a photo of yourself as a new layer
On a new additional transparent layer use the drawing, painting and modelling tools to define your face, fill with colour and model highlights and shadows. Delete the layer with your photograph on it.
Enhance and unify the images with the application of filters, adjustments, colour and saturation.
Save a copy’ of image
Flatten original image Save as JPEG in your Finished Work folder
Postcard 2
Postcard Front:
Freehand digital self portrait (with no imported images).
Use a mirror and use your mouse and drawing tools to do a contour drawing of your face
Remember to use your navigator to zoom in; this will give you greater control with the mouse.
Try a few different brush libraries, like wet media or special effect brushes.
Use the transform tools and liquefy filter to adjust the contour line. Choose your skin colours and brush them in. Use the modelling tools for adjusting highlights, shadows and saturation.
Draw in a background
Enhance and unify the images with the application of filters, adjustments, colour and saturation.
Save a copy’ of image
Flatten original image Save as JPEG in your Finished Work folder
Strange Self Portrait Brief
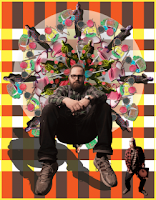 Tim Bereshiem
 Alessandro Bavari
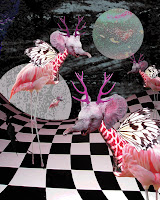
Design Brief Strange Self Portrait
One of Adobe Photoshop’s great features is its ability to manipulate images within their own context, sampling colour, texture, form and shape already available within the image itself. For this reason it is ideal for turning photographs into dreamlike or surreal images with seamless unification of parts.
For the first brief you will be using these specialist features to create a self portrait using interpretations and distortions of your own head and body. Place your new self in a ‘surreal’ textured landscape created by manipulating food drawing images and working these in with landscape images found on the internet.
Subject: Self Portrait
Image size: 29.5cm x 21cm 300dpi
Source images: High resolution images of yourself –face and body
High resolution images of food drawings, landscapes and/or ‘urban’ scapes.
References: Digital Artists
o Andrew Polushkin http://www.polushkin.net/news/en
o Alessandro Bavari http://www.alessandrobavari.com/english/biography/biography.htm
o Tim Berresheim http://www.timberresheim.com/index.php/component/content/article/69-up-a-down-wtf-overview
| Create the new you | Tools |
| Additional facial features | Use the marquee, lasso, quick selection, crop and move tools in conjunction with the copy and paste menu options |
Changed facial proportions | Above tools & Use soft eraser to create seamless edges, clone stamp, smudge and opacity tools You will need to use them in conjunction with the copy, paste, transform and free transform menu options Edit >transform- Scale, rotate, skew, distort, perspective, warp Clone stamp, Burning and Dodging tools |
Mismatched body parts | Above tools & rotate, flip, and adjustments menu options. |
| Create landscape | |
| Texture for landscape | Manipulate your food images with the Filters. Liqify tool and Colour adjustments - hue/saturation, brightness/contrast, replace colour, colour balance, curves |
Landscape & Texture | Blend your manipulated food images with a found landscape image using layer opacity and blending tools Or cut and paste pieces of each landscape together colour |
| Combine new you and landscape | |
| | Refine the image - consider the elements and principles of design. Enhance and unify the images with the application of filters, adjustments, colour and saturation. |
| Complete | |
| | ‘Save a copy’ of image |
| | Flatten original image Save as JPEG in your Finished Work folder |
Design Brief - variation ‘Mixed up Chameleon’
Eric Carle’s ‘Mixed up Chameleon’ was bored with his life. One day he saw a zoo. He started wishing that he was like some of the animals and took on their body parts until eventually he was a conglomeration of all animals. The trouble was he was very mixed up and was sad when he couldn’t catch flys anymore so he wished he was himself again and was happy.
Are you mixed up?? If you are which animal parts would you have??
Using the techniques above create a self portrait of your self as a conglomeration of animal parts and place it in a ‘surreal’ textured landscape.
Texture excercise

Exercise 3. Texture exercise | Filters and Image Adjustment tools |
| · Create a new document. A4 size 300dpi. (29.5cm x 21cm~24.9mg) | Image size Selection (Marquee – rectangle or elliptical) Editing- cut paste etc Filters Type tool Move tool Type tool Image adjustments: Filters & Colour - hue/saturation, brightness/contrast, replace colour, colour balance, curves |
| · Open at 5 of your texture images | |
| · Reduce in size | |
| · Copy and paste into document 3 times (select, cut and paste or duplicate layer) Total 15 images | |
| · Rearrange the 15 images into a grid (CNTL + ‘move’ tool will help you select layers) | |
| · For each image/ layer adjust the colour settings and/or select a filter and apply to the image, write down settings used. The aim is to create as many interesting textures as you can so experiment with combinations | |
| · Using text tool add settings to your document under each image | |
| · ‘Save a copy’ of image | |
| · Flatten original image Save as JPEG in your Finished work folder |
Filter Excercise

| Exercise 2. Filter exercise | Selection tools, Layers and Filters |
| · Create a new document. A4 size 300dpi. (29.5cm x 21cm~24.9mg) save as ‘your name’ ‘exercise name’ eg Jodie_filter excercise | Image size Selection (Marquee – rectangle or elliptical) Editing- cut paste etc Filters Type tool Move tool Type tool Image adjustments: Filters |
| · Open image of yourself | |
| · Reduce in size | |
| · Copy and paste into document 9 times (select, cut and paste or duplicate layer) | |
| · Rearrange the 9 images into a grid (CNTL + ‘move’ tool will help you select layers) | |
| · For each image/ layer select a filter and apply to the image, write down settings used | |
| · Using type tool add settings to your document under each image |
Examples of Photoshop Artists
Andrew Polushkin http://www.polushkin.net/news/en
Alessandro Bavari http://www.alessandrobavari.com/english/biography/biography.htm
Tim Berresheim http://www.timberresheim.com/index.php/component/content/article/69-up-a-down-wtf-overview
Adobe Design Center Gallery http://www.adobe.com/designcenter/gallery/
http://www.adobe.com/designcenter/gallery/swf/index.html#u_sContent=recife
http://www.adobe.com/designcenter/gallery/swf/index.html#u_sContent=torres
http://www.adobe.com/designcenter/gallery/swf/index.html#u_sContent=freestyleacademy
http://www.adobe.com/designcenter/gallery/swf/index.html#u_sContent=krijnen
http://www.adobe.com/designcenter/gallery/swf/index.html#u_sContent=benthomas
Deviant Art www.deviantart.com
http://robcarlis.deviantart.com/art/Lightin-117047385 (Artist- light)
http://voices-in-my-head-27.deviantart.com/art/thingyfly-116829588 (Artist- drawing)
http://browse.deviantart.com/?qh=§ion=&q=sukiro (Artist- manga)
http://browse.deviantart.com/?qh=§ion=&q=sukiro#order=9&q=monstror (Artist- fantasy)
http://Blue-Fish.deviantart.com/art/Assignment-Photoshop-Collage-111039656 (Artist- student)